GRP Flat Table Boatbuilding 7
Foam Panels
Construction Evolution
- In Chapter 4 the traditional-construction method for foam-sandwich construction was outlined. The big problem with this method was the time, effort and expense taken to produce a smooth exterior finish on the hull using filler.
- The process then evolved, to making flat panels on a smooth table, which was the process briefly described in Chapter 6. This was NOT the end of the evolution – the development carried on. The new discovery of the flat-table stage made it possible to produce a smooth, outer surface without filler, but as part of that process, vacuum bagging was used.
- The vacuum bagging led on to a further evolution that is still in use today in commercial boat building. The current method is vacuum bagging into a shaped mould called resin-infusion. The reason that this process is not being described, is because it is not a simple, quick or cheap building method for the amateur. It returns to the first commercial fibreglass boatbuilding method of using a mould which is expensive to build. More sophisticated, expensive equipment is used to suck resin across the mould. This means that whilst the 'Flat Table' is not the most advanced building method, it is the best, simplest and affordable way for an amateur to fabricate, or build one-off, irrespective of whether it is the complete craft, a modification, or a repair to a boat.
Steps in the build
- Prepare a polished flat surface
- Mark the desired panel shape on it
- Lay-up the gel coat
- Lay-up the external layers of fibreglass
- Attach the PVC foam and vacuum bag it
- Apply more fibreglass as the internal skin
- When the structure is set, peel it away from the polished surface
Easy! – but just a couple of questions.
How do we arrive at the shape of the panels?
How are the panels joined together?
These are further issues that will be outlined here.
The shape of the panels
The shape of the panels can be taken from scale drawings. If you have designed the boat yourself this will be straightforward. If you are new to scale drawing - do not fear. If you intend to build a boat this is just another part of the learning process. Paper, ruler 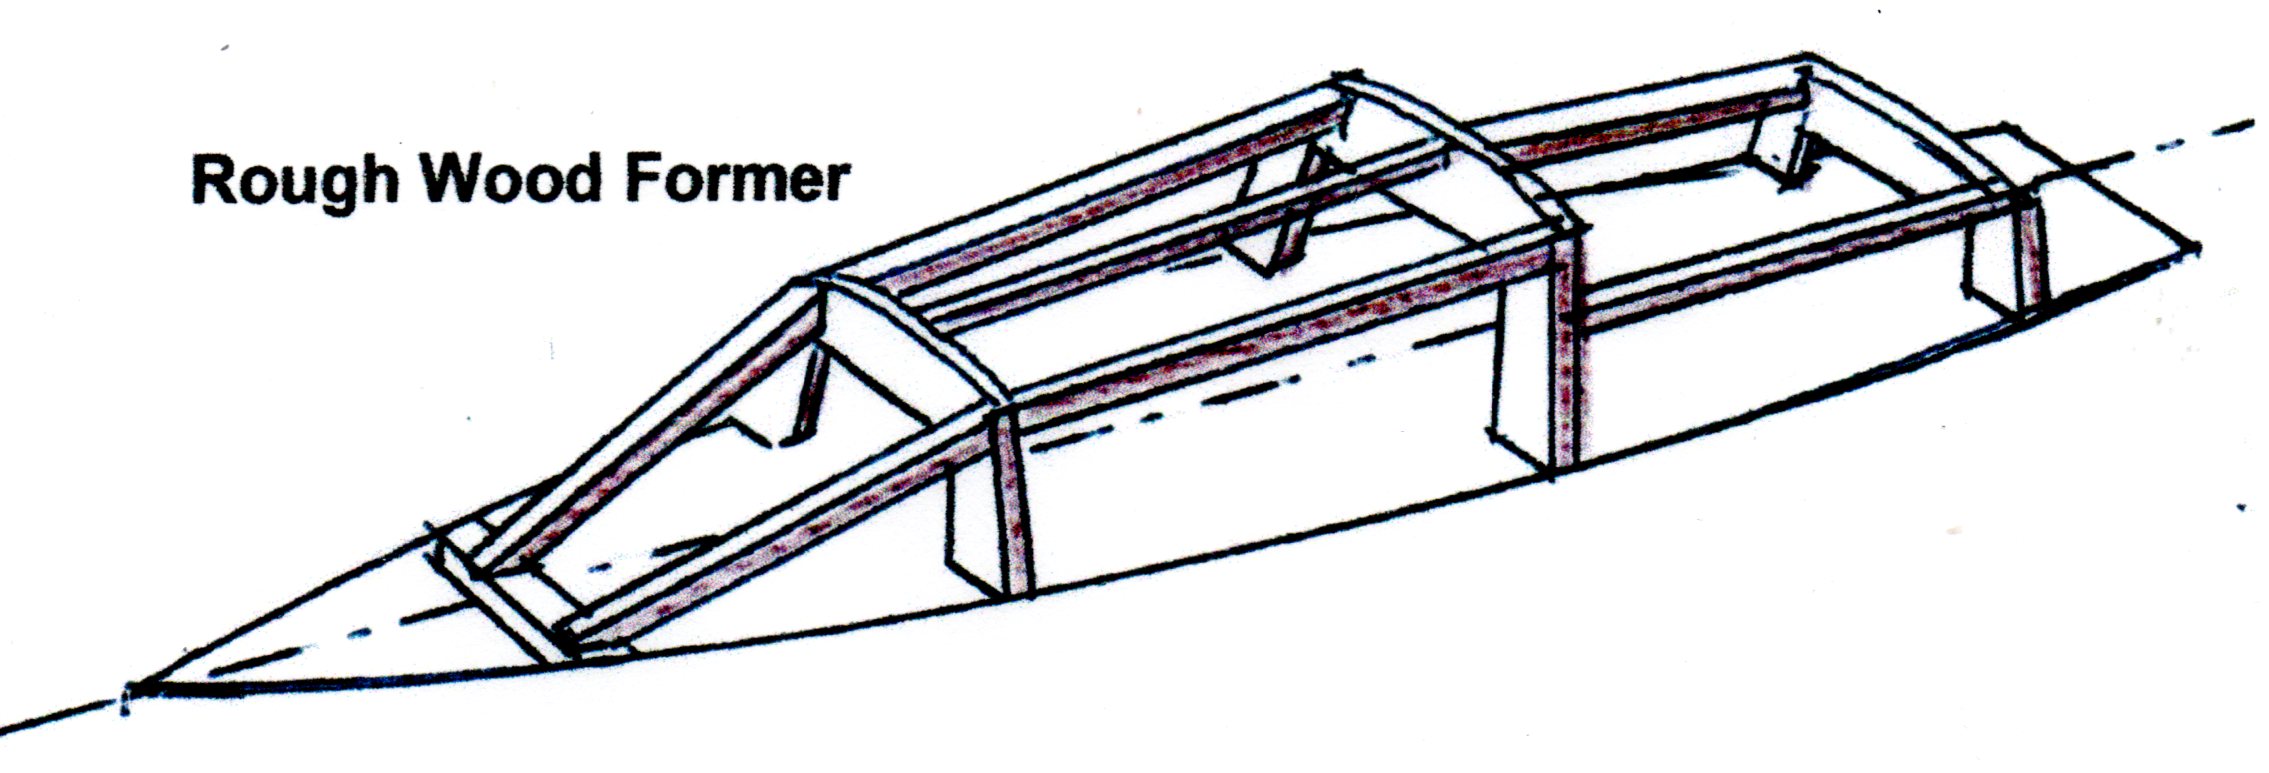 and pencil can still do it, or there are simple, free, computer programmes available for getting true, plywood shapes for boatbuilding. These will also work for foam shapes. The main problem to appreciate when drawing in 2D is that sloping surfaces represented on a flat drawing may not give you the true lengths of the edges of the panel. Calculations have to be made.
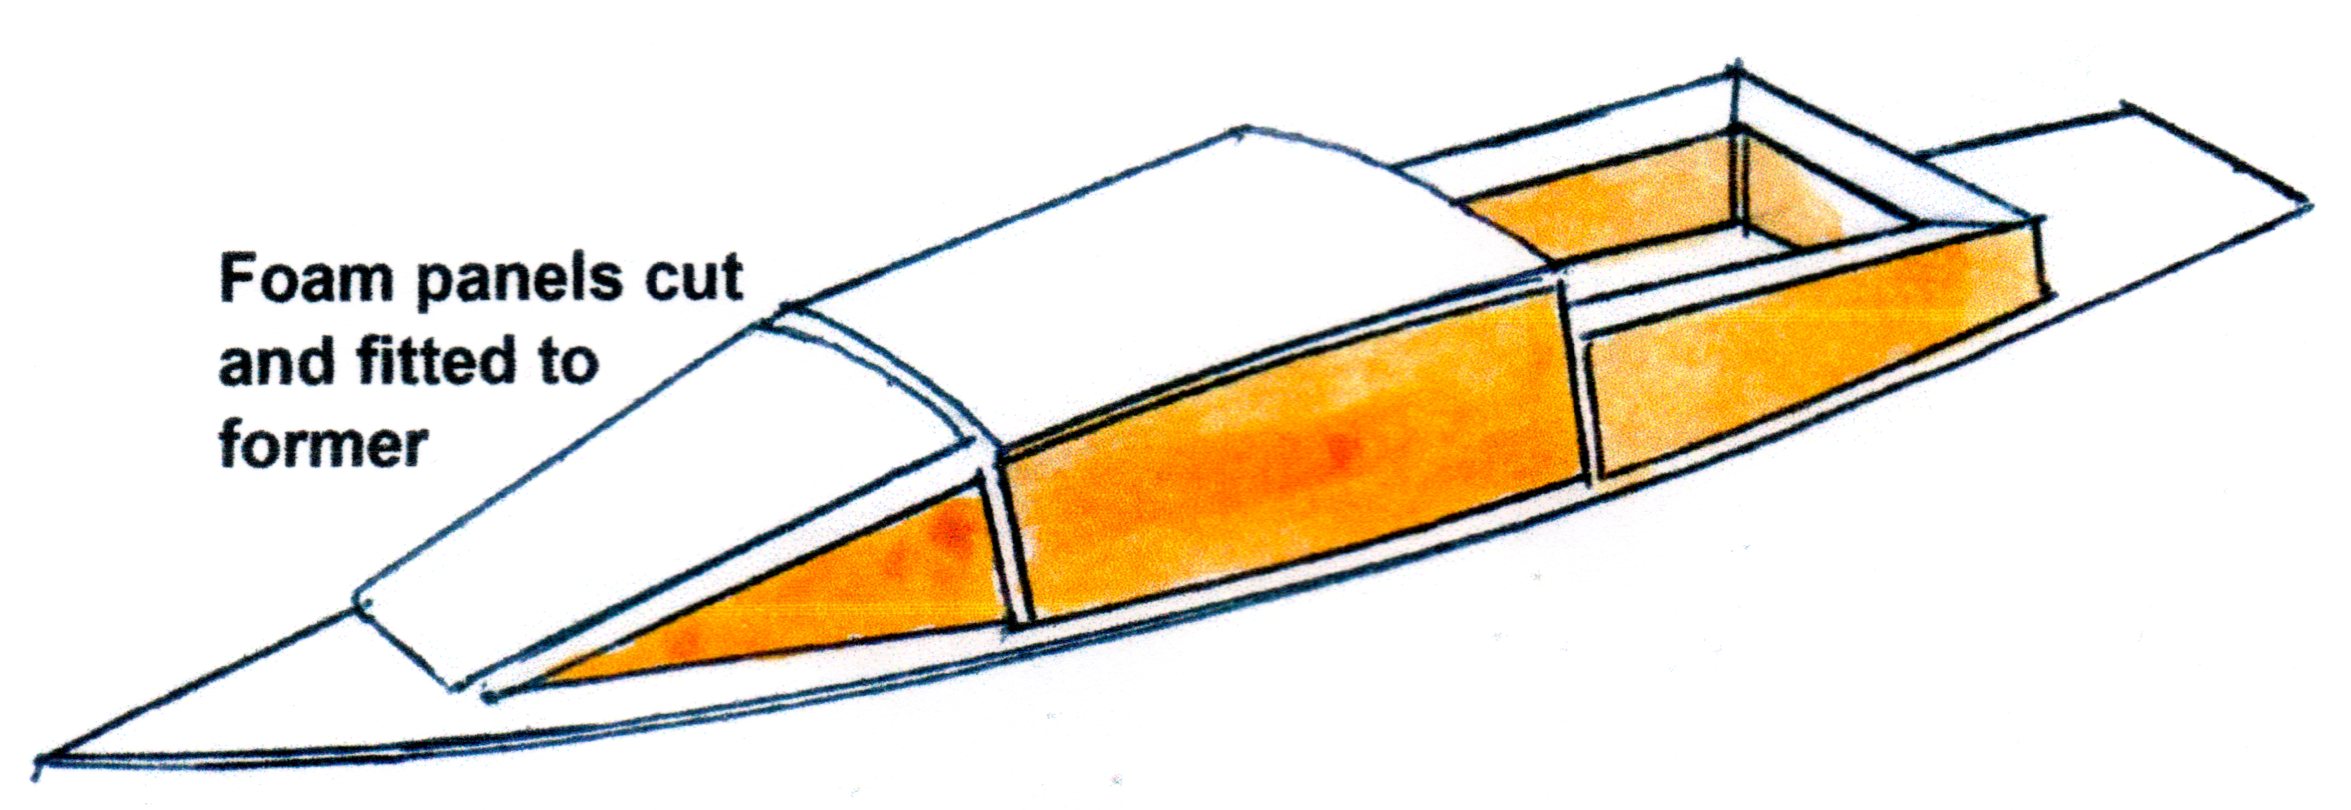 If you cannot do the calculations, then you just have to be practical. Try to test it out with cardboard, or make rough-wood, full-size models separate from the craft. It can be achieved very rapidly by nailing plywood patches over joints in scrap-wood boards to hold them together. The shape of the panels can then be measured directly. If a number of panels are cut out they should be marked to keep a record of where they are designed to go. Use some understandable system. Mark which is the OUTSIDE on the panel. This will eventually go DOWN on the table.
Panels on opposite sides of the boat will be the same shape, but care must be taken to make a left-hand and a right-hand panel. If panels join side-by-side or end-to-end draw some ‘register’ marks across the join on the inside, to ensure accurate alignment when they are laid on the table.
Foam Joints
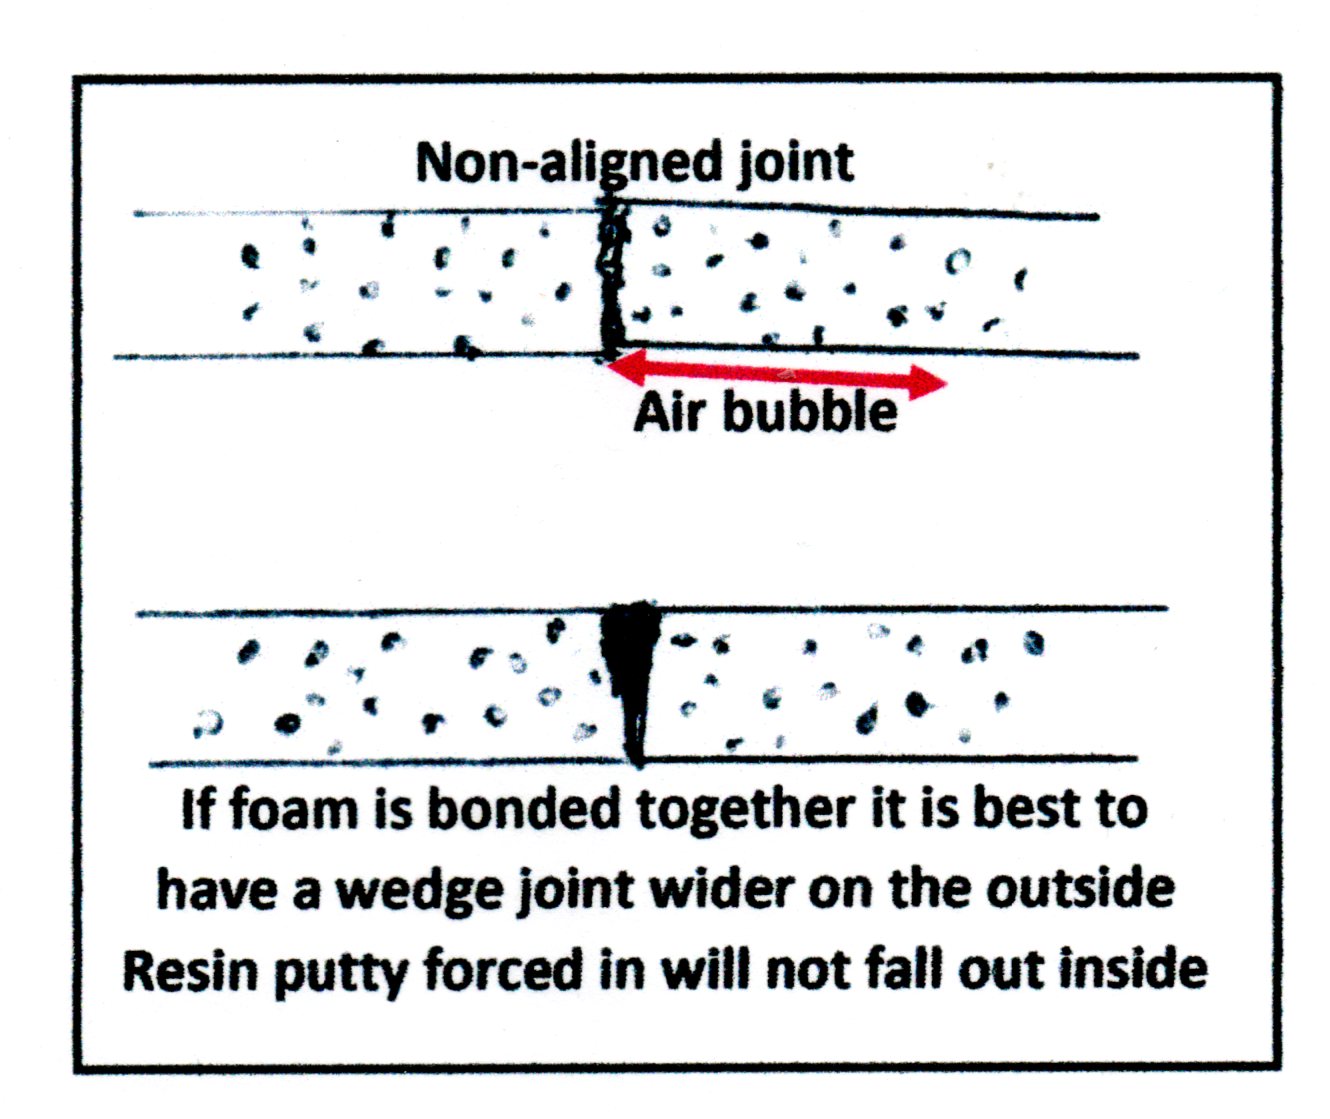
 To avoid waste, a panel can be made from several pieces linked together. I say ‘linked’, because it is tempting to ‘glue’ them together using ‘resin putty’. This is the mix of polyester resin and micro balloons. Gluing is not necessary as it takes time and care and it can introduce another problem – misalignment of the foam. If the edges are not perfectly in line with each other, they will have to be left under weights on a perfectly flat surface to ensure accuracy. Joints that are slightly stepped/non-aligned, tend to trap air bubbles beneath them (see below) when they are bonding down to the glass on the mould table. The additional stiffness of the joint itself can act as a bridge to prevent the foam from pressing down evenly onto the glass. For these reasons it is desirable NOT to cement the joint if possible, but to use temporary fixings, such as 65mm galvanised nails into the edges, that can be pushed in by hand like oversized pins. This allows the panel to be handled for trial fitting, or for marking onto the flat table. When the panel is about to be bonded down onto the glass, the nails can be removed which will allow each piece of foam to lay perfectly flat. The joins between pieces will naturally fill with resin during the vacuum-bag bonding process. If voids should remain in any joint, more resin putty can be used once the foam is attached to the glass beneath it.
 The really good news is that absolute accuracy of panel shape is NOT essential as it is when working with plywood or solid wood. The foam panels can be cut with a hand saw or craft knife and they can be fine trimmed with a 110mm grinderette. Foam is lightweight for easy manipulation. If you are building on a wooden former, the panels can be trial fitted onto it. Amazingly, gaps of up to 10-15mm are allowable and later, they may even be beneficial. It is an advantage to slightly angle mating edges of the foam to allow resin to get into the gap between pieces to make a strong bond. This is of particular importance when gluing shaped edges together with resin putty, which will be done in certain positions. Having ‘open’ joints, not the perfect edge-to-edge ones, that must be used with wood, is something that takes a little getting used to.
Panel sizes
Sheets of foam, like sheets of ply or particle board will be produced in standard sizes. Possibly 8 x 4 ft, (2440 x 1220mm), or 5ft square, or smaller, are common dimensions. The flat table(s) may determine the maximum panel size that can be made, so 30-40-50 feet or more is possible, if the workforce is available, but for the amateur it is important to know that:
- Panels CAN be joined. How this is done will be explained.
- For various reasons, it is rarely worth making a single panel less than 150mm (6ins) wide. There are ways around this, which will also be explained.
Fixings through foam panel
A problem with foam sandwich is that bolting through it will cause a slow deformation of the glass and foam around the location of the bolt. If this happens the bolt will become loose. The problem can be solved by cutting away the foam around the bolt and substituting a more rigid material that resists compression - often plywood the same thickness as the foam is used. Experience will show that the wood has to be very dense, or it too will deform. Something more solid than plywood would be preferred.
Whilst in theory it may be possible to plan the position of every bolt prior to construction, this is really only viable for commercial construction. In the real world it is not quite so simple and, sooner or later, there will be additional fittings to be fixed that have not been catered for with inserts. You can attempt to identify all bolt locations, but I found that eventually some were not required and others had to have new fixing points arranged. The advice about NOT gluing joins also holds good for insert pads. They will be firmly attached during the bonding process if they are used. Some locations such as window frames or headsail track where a line of fixing might be used could benefit from putting in continuous insert strips at the bonding phase. Many windows are now glued into recesses, so fixings may not be required. It is necessary to record accurately where insert pads have been placed, so that they can be located later.
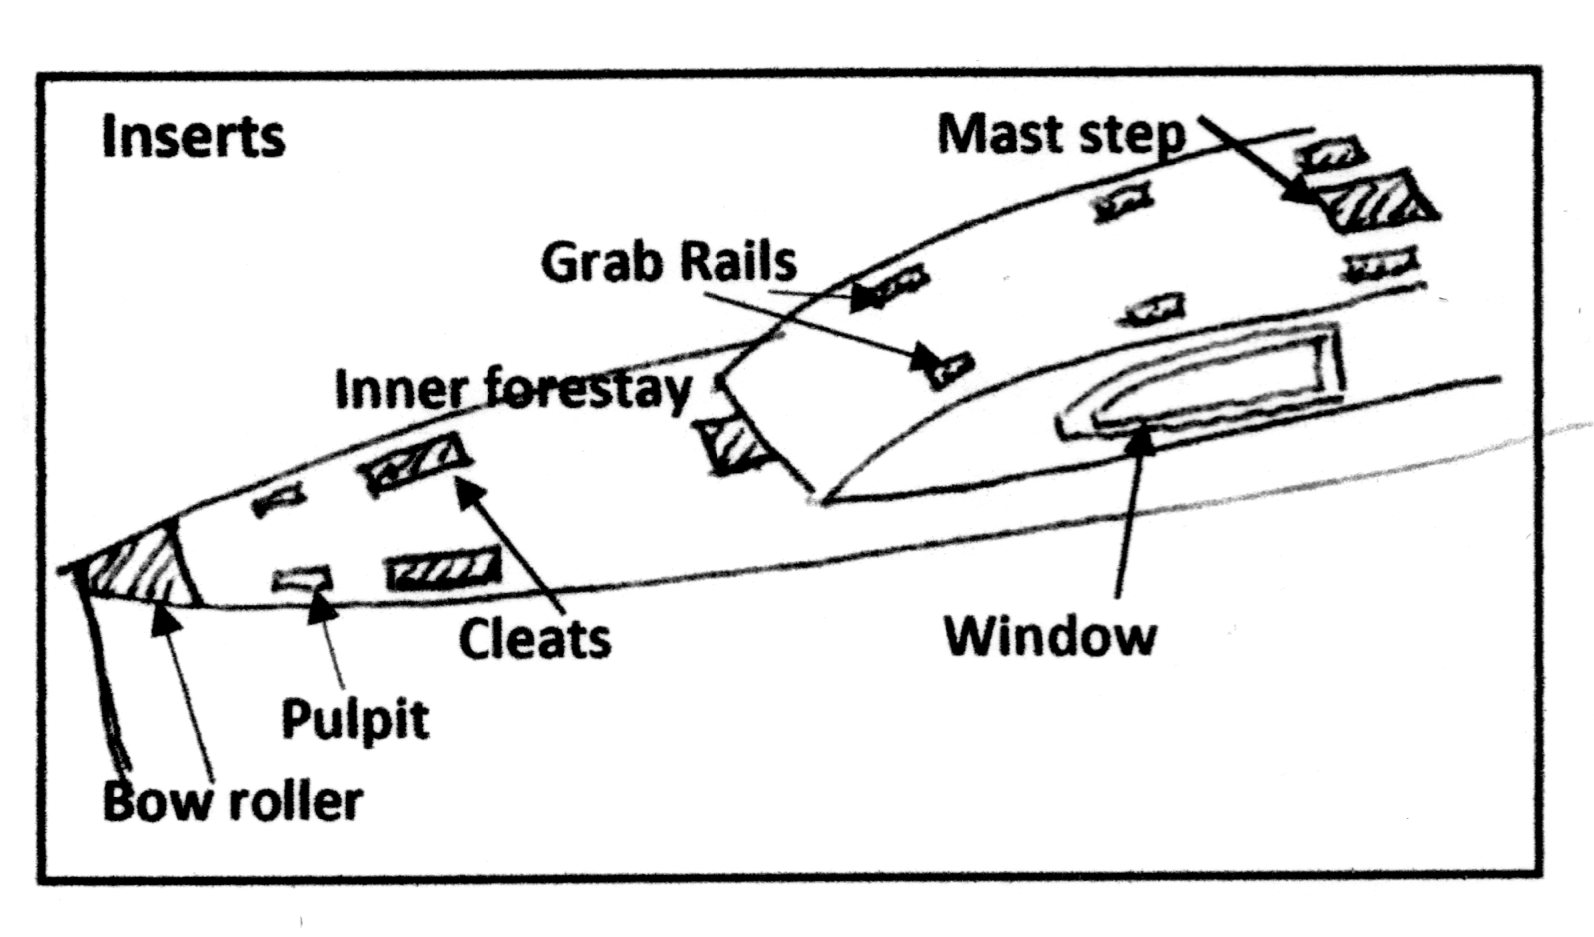 I found that retro-fitting for bolts was easily done with hole saws from the outside, but NOT removing the inner skin. Dig the foam out. The fitting will obscure the insert hole, which is bigger in diameter than the bolt passing through it. Additional laminate can be applied. I filled the hole with resin putty and this treatment has stood the test of time. There are a number of solutions for removing foam between the glass layers through a bolt hole; bent nails in drills to widen the bolt hole etc. and it is possible to purchase proprietary fittings for fixing. However, the message is, that whilst insert locations can be considered and action taken at this construction point, it is not critical, as further steps can be taken later to achieve practical results. It is important for bolts to pass right through the inner skin for secure fixing. Beefing up the internal laminate at this stage whilst it is on the table and can be worked downwards, will greatly help later to carry and disperse the load. It is very important to have internal backing plate arrangements of various sizes, depending on the load. Attaching to the outer skin only is not to be recommended for serious fixings.
Other attachments
When the interior is being fitted out later it is worth knowing that small fittings may be attached by using screws through the inner skin only. A number of attachments will also be fibreglassed to the inside of the skin, especially structural components and interior furniture. Image. RM Yachts